Why Your Car Shakes When You Brake in College Station

proadAccountId-389775 • June 15, 2026

Why Is My Steering Wheel Shaking When I Brake? A College Station Driver’s Guide

Worn brake caliper
CALL FOR BRAKE SERVICE NOW BOOK AN APPOINTMENT FOR BRAKE SERVICE

There is a distinct moment every driver dreads: you’re cruising down Texas Avenue, you step on the brake pedal to slow down for a changing light, and suddenly the steering wheel starts violently violently shaking in your hands. It feels like the front end of your car is trying to shake itself apart, but as soon as you let off the pedal, the ride smooths right back out.

As someone who has spent decades managing automotive diagnostics and overseeing complex chassis repairs, I can tell you that a shaking steering wheel is one of the most common complaints we see on the shop floor. It's an unsettling feeling, but it is your vehicle's way of sending an SOS.


When your steering wheel shakes exclusively during braking, it means there is a mechanical pulsation in your braking system that is traveling up through your suspension, into your steering rack, and directly to your hands. Let’s break down exactly what is happening under your wheels, why College Station’s unique driving conditions make it worse, and how a professional diagnostic process fixes it correctly the first time.


The Primary Culprit: "Warped" Brake Rotors (Brake Torque Variation)

Ask almost any driver why their steering wheel shakes when braking, and they will likely tell you, "Your brake rotors are warped." While that’s the common terminology, in the modern shop environment, we look at it through a more precise lens called Brake Torque Variation (BTV).


Your brake rotors are the metal discs that spin along with your wheels. When you step on the brake pedal, your brake calipers squeeze your brake pads against both sides of that spinning rotor to create the friction needed to stop your vehicle.


[Brake Pedal Pressed] ➔ [Caliper Squeezes Pads] ➔ [Contact with Spinning Rotor] ➔ [Vehicle Stops]


True warping—where the metal disc physically bends out of shape like a potato chip—is actually quite rare. Instead, that shaking is usually caused by two specific technical issues:


1. Disc Thickness Variation (DTV)

Over thousands of miles, if a rotor does not spin perfectly true, it will make uneven contact with the brake pads even when you aren't stepping on the brakes. Over time, the pads shave off microscopic amounts of metal from only certain spots on the rotor. Now, the rotor has thin spots and thick spots. When you finally apply the brakes, the pads hit a thick spot, then a thin spot, then a thick spot, thousands of times a minute. That rapid grabbing and releasing transmits a violent pulsation up through your steering column.


2. Uneven Friction Material Deposition

This is highly common in our hot Texas climate. When you drive through stop-and-go traffic on Harvey Mitchell Parkway in the dead of summer, your brakes get incredibly hot. If you have to come to a sudden, hard stop and then hold your foot firmly on the brake pedal while sitting at a red light, the hot brake pad can actually transfer a microscopic layer of its own friction material onto one exact spot on the scorching rotor. This creates an uneven "sticky spot." Every time that spot rotates past the brake pad, it catches, creating a distinct vibration in your steering wheel.


The Local Factor: Why Brazos Valley Driving Accelerates Brake Vibration

Brake systems rely entirely on heat dissipation. They take the kinetic energy of your moving vehicle and convert it into thermal energy (heat).

Operating an auto repair facility in College Station means we see specific environmental factors that put immense stress on local braking systems:

  • Extreme Summer Heat: When ambient pavement temperatures soar past 100°F, your brakes start at a much higher baseline temperature. They cannot cool down efficiently between stops, making material deposition and uneven rotor wear much more likely.
  • Heavy Stop-and-Go Traffic: Navigating the heavy traffic spikes around the university, especially on game days or during peak afternoon rush hours, means constant, repetitive braking without long stretches of open road to let airflow naturally cool your rotors down.


Beyond the Rotors: Other Critical Components to Check

While rotors are the usual suspect, an experienced diagnostic approach requires looking at the vehicle as a complete, interlocking system. If a shop simply slaps new rotors on your car without looking at the bigger picture, the shaking will often return a few weeks later.

When we evaluate a steering wheel shake, we also meticulously inspect:

  • Worn Suspension Bushings: Your control arm bushings are designed to absorb road shock. If these rubber components are torn or degraded, even a minor, normal brake variation will be amplified tenfold, traveling straight up into your steering wheel.
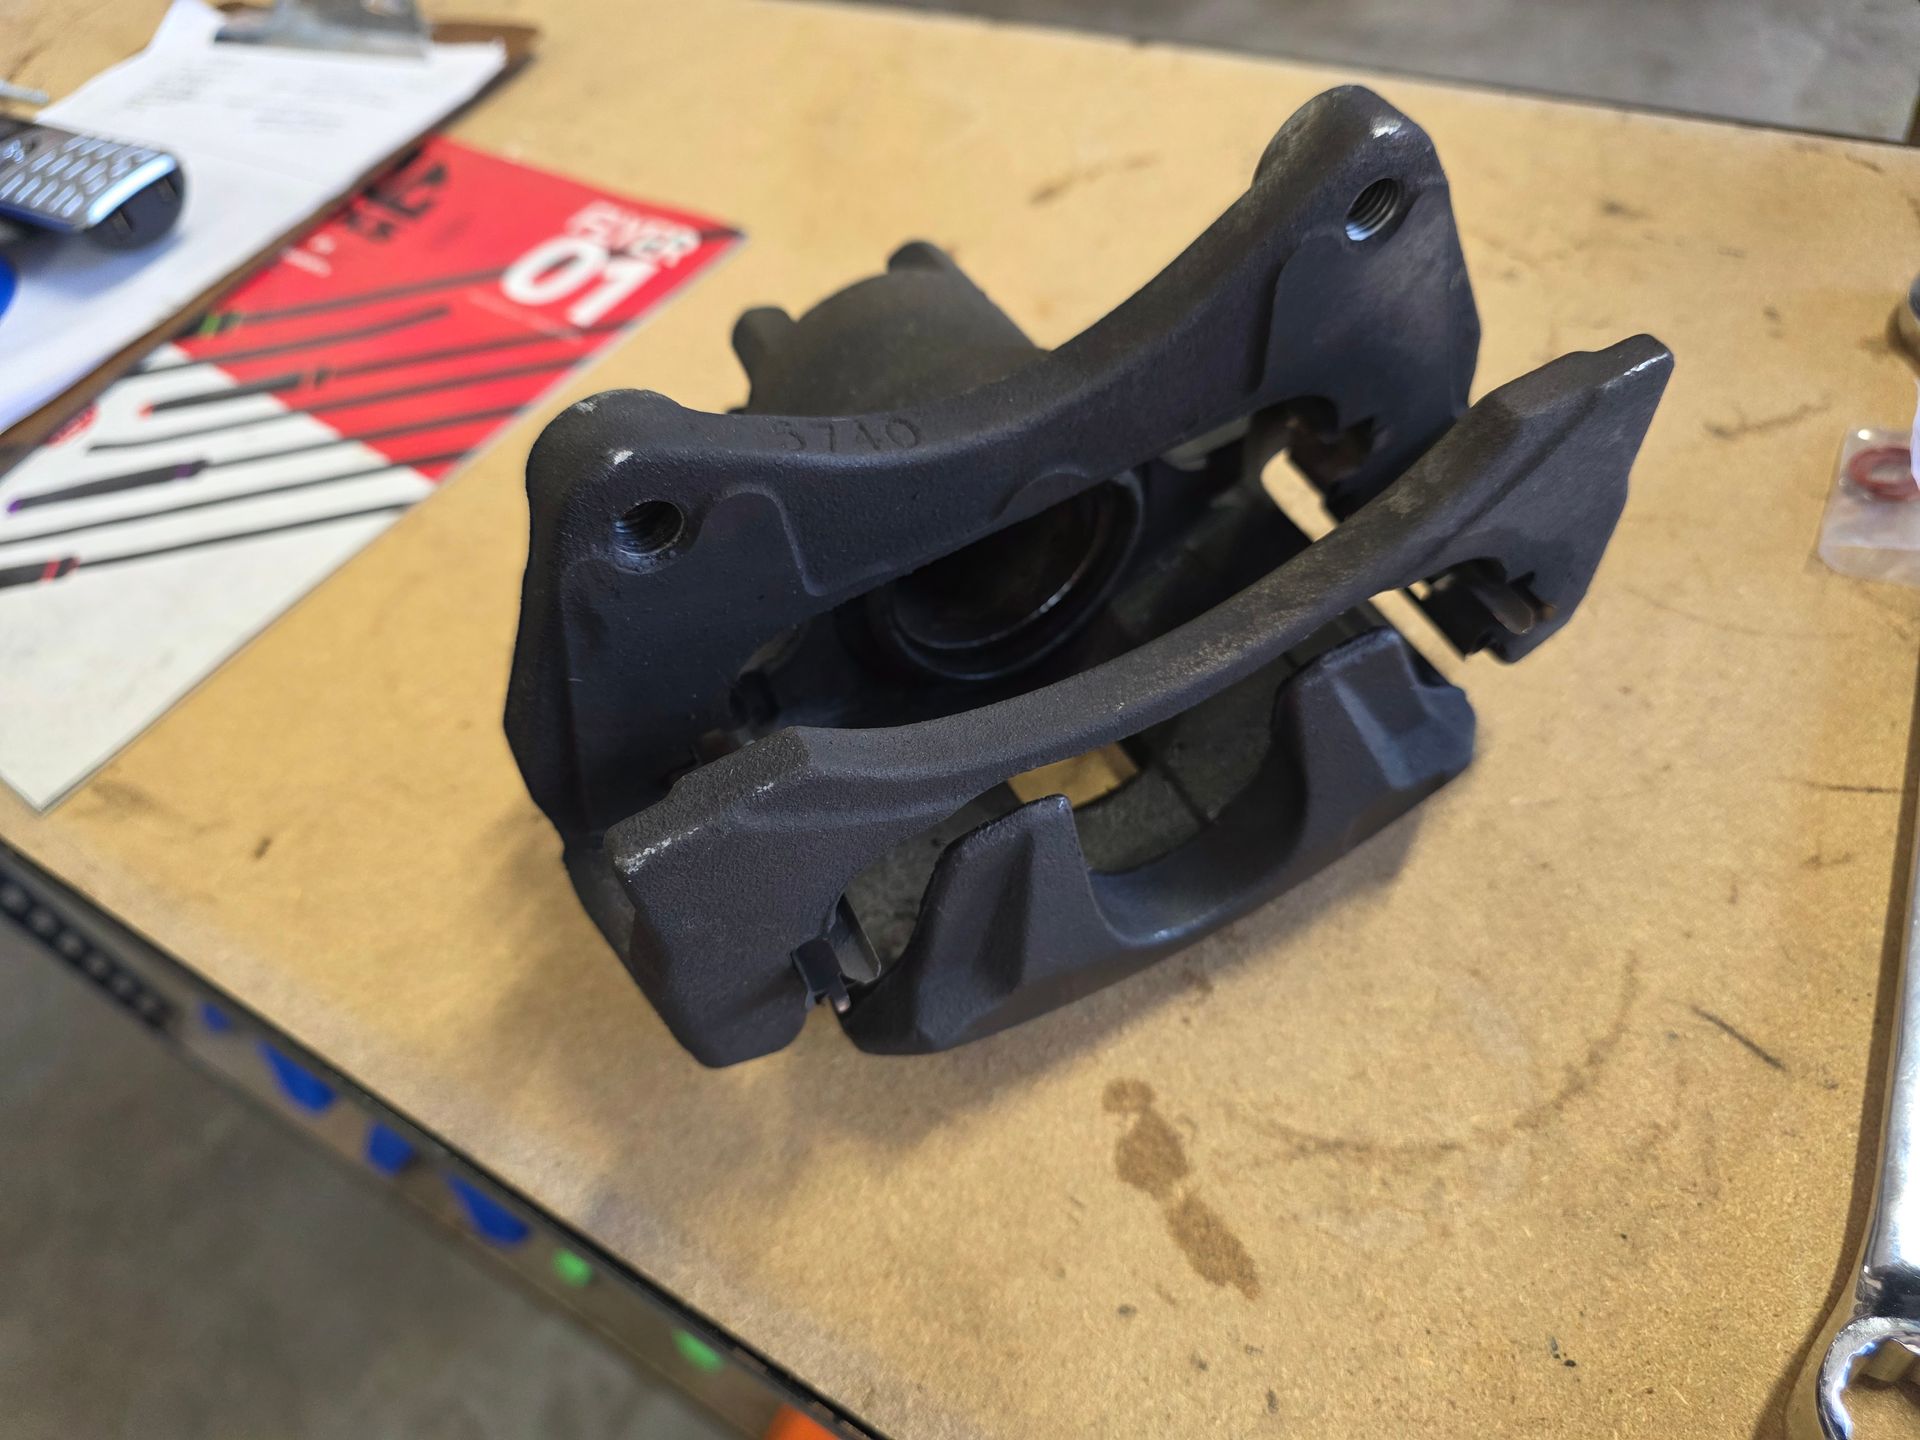
  • Stuck Caliper Slide Pins: If the pins that allow your brake caliper to slide back and forth become seized or lose their lubrication, the caliper will only push from one side. This bends the rotor under braking pressure and creates a severe pulsation.
  • Hub Runout: If the wheel hub itself—the component the rotor sits on—is rusted or slightly distorted, a brand-new rotor bolted onto it will automatically spin unevenly, guaranteeing a return of the vibration.


How We Solve Brake Shaking: The Professional Inspection Process

Fixing a braking issue isn't about guesswork or throwing parts at a symptom; it's about rigorous oversight and manufacturer-specific procedures. When a vehicle comes into our shop with a front-end shake, our technicians follow a strict quality protocol:


Step 1: Precision Measurements

We don't just look at a rotor and assume it's bad. We use a specialized tool called a micrometer to measure the thickness of the rotor at multiple points around the disc to verify Disc Thickness Variation down to the thousandth of an inch. We also use a dial indicator to check for "runout"—ensuring the rotor spins perfectly straight on the hub.


Step 2: Total System Evaluation

We inspect the entire braking and chassis ecosystem. This includes checking the condition of the brake fluid for moisture content, evaluating pad wear patterns to ensure the calipers are operating smoothly, and prying on suspension components to verify ball joints and bushings are tight.


Step 3: Premium Component Selection & Service

If the rotors are below the manufacturer’s minimum thickness safety specifications, or if severe material deposition has occurred, they must be replaced or machined on a precision brake lathe. We always recommend pairing high-quality, premium friction material pads with matching rotors to ensure proper heat dissipation and noise-free operation.


Step 4: Proper Pad Bedding

Before delivering any vehicle back to a customer, our technicians perform a proper "bedding-in" procedure. This involves a series of controlled stops that gently heats the new pads and deposits a perfectly uniform, microscopic layer of friction material across the new rotors, sealing them against future hot spots.


Don't Ignore the Shake: Take Action Today

A shaking steering wheel isn't just an annoyance; it is a safety hazard. Over time, that constant vibration acts like a hammer against your steering rack, wheel bearings, and suspension components, turning a standard brake service into a much more expensive mechanical repair. More importantly, uneven brake wear compromises your vehicle’s stopping distance in emergency situations.


If you are tired of white-knuckling your steering wheel every time you slow down, let our experienced team perform a transparent, thorough evaluation.


You can learn more about our complete line of domestic and import repair options by visiting our professional brake repair in College Station service page, where we detail our commitment to using manufacturer-specific procedures.

Ready to get your vehicle riding smoothly again? Schedule an inspection with us or visit our shop on Google Maps to get precise directions to our facility. We'll get under the wheels, identify the exact root cause, and ensure your vehicle has the reliable stopping power you need.

June 6, 2026
The Hidden Cost of $35 AC Cans: Why DIY Freon Can Kill Your Car’s Air Conditioning We’ve all been there. It’s mid-July in Texas, the thermometer is pushing triple digits, and your car ac blowing hot air makes the cabin feel like a literal pizza oven. Your immediate instinct? Open your phone, look up auto ac repair near me , and brace for a massive bill. But then you see it: a row of bright, $35 "DIY AC Recharge" cans at the local auto parts store promising a cheap, five-minute fix. It looks incredibly simple. You just snap on a plastic quick-connect hose, pull the trigger, and save yourself a trip to the shop. Here is the hard, unvarnished truth from a master diagnostic technician: that $35 can is the most expensive gamble you can make with your vehicle. Trying to bypass a real repair with an over-the-counter chemical band-aid can easily cause a $1,500 catastrophic system failure before the week is out. Driving Blind: The Low-Side Pressure Illusion Your car’s air conditioning isn't just a basic fan blowing over cold liquid. It’s a highly sophisticated, closed-loop network split into two critical halves: the low-pressure side (where heat is absorbed from the cabin) and the high-pressure side (where the compressor pumps and condenses that heat away). These two sides rely on a delicate balance. To service or diagnose an AC system safely, a technician must monitor both pressures simultaneously. Those $35 store-bought cans? They only have a single, cheap mechanical gauge that hooks exclusively onto your low-side service port. Charging your AC this way is the mechanical equivalent of driving down the highway blindfolded. You are missing half of the equation. While the low-side gauge might show a deceptively normal reading, your high-side pressure could be dangerously skyrocketing behind the scenes due to a bad cooling fan, a clogged condenser, or an internal blockage. Dumping more refrigerant into that mix without seeing the high-side reality is a fast track to blowing out lines, popping pressure relief valves, or destroying your compressor entirely. "Automotive AC systems are sealed loops—they don't consume freon like an engine consumes oil. If your system is low, you have a physical leak that requires a targeted diagnosis, not an unmetered chemical top-off." Two Ways a $35 Can Destroys Your AC When a driver blindly introduces store-bought freon into an already unstable system, it usually triggers one of two severe mechanical disasters: 1. Liquid Slugging (Compressor Suicide) Modern vehicles operate on remarkably tight tolerances. Instead of the heavy-capacity systems of the past, today's automotive loops require a highly precise volume of refrigerant—often specified down to the exact individual gram weight. When you try to eyeball it using a generic, color-coded gauge, you almost always overcharge the system. This leads to a nightmare scenario called "liquid slugging". Your AC compressor is engineered strictly to compress refrigerant in its gaseous state. Gasses compress easily; liquids do not. When an overcharged system forces liquid refrigerant back down into the compressor intake, the compressor tries to squeeze a solid volume. The internal reed valves shatter instantly, pistons snap, and the entire compressor suffers total structural failure. This internal explosion flings sharp metallic shrapnel screaming through your lines, permanently contaminating every single component in the loop. 2. The Nightmare of Chemical "Leak Sealant" Gunk To make their products more appealing, DIY chemical manufacturers love to pack their canisters with proprietary "stop-leak" compounds. They claim it seals small leaks from the inside out. Sounds great on paper, but it is a death sentence for your climate control network. These chemical sealants are engineered to react with air and moisture to form a hard, epoxy-like scab. Guess what happens when your AC system has a physical leak? Atmospheric air and humidity migrate inside through the opening. The moment that DIY chemical hits the internal moisture, it hardens into a thick, glue-like sludge. It permanently clogs the microscopic passages of your expansion valve, blankets the internal walls of the evaporator core, and chokes the condenser. Worse yet, this sticky contaminant completely ruins professional recovery equipment. Independent shops must test for these sealants before connecting their machines. If stop-leak is detected, the shop will refuse to service the vehicle until you replace the entire contaminated system at an immense material cost, because hookups would destroy their multi-thousand-dollar equipment. The New Car Dilemma: R134a vs. R1234yf If your car was built over the last decade, the stakes are even higher. While older cars widely utilized R134a refrigerant, nearly all vehicles manufactured after 2015 have transitioned to a highly engineered, eco-friendly chemical compound known as R1234yf. Executing an r1234yf ac service requires an entirely different tier of technical competence and specialized equipment. This modern refrigerant is incredibly sensitive to minor variations in system volume. Trying to hack a post-2015 system with a generic parts-store can can instantly throw the vehicle's onboard climate computer into a hard fault code, bricking the entire climate control network and invalidating your factory or extended warranty. These systems don't tolerate guesswork; they demand automated Recovery, Recycling, and Recharging (RRR) stations to manage the loop under exact parameters. Conclusion: A Diagnostic Test is Cheap Insurance When your vents start blowing warm, a vehicle diagnostic test isn’t an unnecessary expense—it is the ultimate form of low-cost insurance for your car’s longevity. A simple pressure drop could be caused by an electrical relay failure, a blown fuse, a failing cooling fan, or a tiny O-ring leak that costs pennies to swap out. Dumping a DIY can into a system with an underlying electrical issue won't fix a thing; it will just result in an expensive overcharged blowout. When you schedule a definitive car ac recharge college station service at a premier independent facility, our master technicians take the guesswork completely out of the equation. We don't guess—we measure: We isolate and record both high and low-side pressures simultaneously. We safely extract and filter your remaining refrigerant to measure the exact volume loss. We inject specialized UV contrast dye to pinpoint the exact root cause of the leak. We run a prolonged deep vacuum to boil out destructive moisture before recharging the loop back to the exact OEM factory gram specification. Don't Suffer Through the Texas Summer Heat. If your AC is not blowing cold, set up an appointment, or give us a call today! Do not gamble your compressor, your climate control network, and your hard-earned money on a temporary chemical quick fix. If your AC is losing its edge, let our master diagnostic technicians restore your system safely, correctly, and permanently. Text our service desk directly or book your precision AC diagnostic appointment online now before the next major heatwave catches you off guard.
Seized brake caliper
April 23, 2026
Avoid overpriced brake repairs in College Station. Learn the 4 red flags of dishonest shops, from "magic" price hikes to unnecessary parts, and see how Quicker Sticker does it differently.
Quicker Sticker Modern Auto Repair's Full Service Maintenance
April 21, 2026
Learn the difference between conventional, synthetic blend, full synthetic, and 100% synthetic oil changes. Quicker Sticker in College Station explains which oil protects your engine best.
By proadAccountId-389775 March 24, 2026
The Hidden Cost of the "Brake Slap": Why Surface Preparation is Non-Negotiable
February 4, 2026
Don't be fooled by a logo. Learn the difference between a true ASE Blue Seal shop and competitors using the "One-Tech Loophole." See why Digital Video Evidence is the only trust signal that matters.
January 15, 2026
Confused about the 2025 Texas inspection laws? If your car is registered in Houston or Dallas but lives in College Station, read this before you drive home for a test.
Technician performing repairs on vehicle
January 5, 2026
Most shops claim perfection. We claim honesty. Read the story of the $3,000 mistake Quicker Sticker made, and why finding a mechanic who admits fault is the safest choice for your car.
December 29, 2025
More Than an Oil Change: Why Modern Tech & Modern Mechanics Agree on Full-Service
Badge for a Carfax Car Care Service Center
December 10, 2025
Learn about the advantages of having your vehicle repaired and maintained at a professional auto repair facility, and why you should avoid a "shade-tree" mechanic.
Technician performing electrical work
September 29, 2025
Is your car having trouble starting or are your lights flickering? Learn the common signs your vehicle needs electrical system repairs and what to do next.